Autoflowers are a class of cannabis that has only thrived on the commercial market in the last few years. Today, they are taking the cannabis market by storm with their ease of growth and great results. Autoflowering strains provide fantastic results in little time, often surging from seed to harvest in as little as 7 weeks.
Both beginner and advanced growers will have a fun and easy time raising these varieties. Whether you plan to grow autoflowers indoors or outdoors, most of the practices are similar to growing regular strains of cannabis yet with some key differences.
What are autoflowers?
Autoflowering cannabis strains are the descendants of a wild strain of hemp first identified as “ruderalis” in Russia during the early 1940s. As the name implies, autoflowers automatically shift to the flowering period without intervention.
These are different from most strains of cannabis, which are known as “photoperiod” strains. Photoperiod plants do not start flowering until they get specific signals from the sun that winter is coming, and so need special light schedules to be induced into making buds.
Conversely, ruderalis plants do not need any type of signal. Instead, ruderalis plants start flowering when they reach 3-4 weeks of age no matter what is going on with the sun or light schedules, and their buds are ready to harvest only a few months from seed.
There are a staggering 200+ autoflowering strains on the market. Some popular strains include Cream Caramel Auto, Afghan Kush Ryder, and Autoflowering Blueberry.
Pros of autoflower cannabis
- Greater variety: The shorter growing season means you have a higher level of autoflowering varieties. Imagine having the opportunity to grow five different strains in a single season. Multiple harvests are especially useful if you enjoy the growing process and are keen to sample as many different strains as possible.
- Uncomplicated setup: If you grow weed the traditional way, you will typically require a specific grow room and a separate flowering room. With autoflowering weed, you only need a single space. If you have several rooms, you can time your growing to guarantee a harvest every few weeks. If you grow using non-autoflowers, you have to ensure your grow room has light-proof sealing. In contrast, a light leakage has no discernible impact on the flowering stage of your autoflower cannabis.
- Durability: As autos contain ruderalis genes, they are more robust than other cannabis plants. Remember, they are based on plants that could grow in the harsh Russian weather conditions. If there is a power outage, a typical cannabis plant will have its flowering and growth phases interrupted. This fact could play havoc with their growth cycle. You do not have this problem with an autoflowering plant.
- Fast blooming: There are auto strains with a flowering time of just five weeks. Add in a 2-4-week vegetative stage, and you could theoretically grow a strain from seed to harvest in only seven weeks. Bubble Kush Auto, for example, is ready to collect 7-8 weeks after sprouting.
- Stealth growing: While varieties of autoflowering strains are getting bigger, you can still find versions that grow to about 40-50cm. As a consequence, you can plant them in a closet, tent, or even on a balcony. You could also hide such a plant in a remote field if the grass is tall enough. Also, autos do not require a “support system” to hold up long branches that could bend or break as the buds get larger.
- Easy lighting: There is no need to change your light cycle to a 12-12 schedule. Therefore, you can keep a consistent lighting schedule all year round if you wish. Many autoflower growers believe that providing light 24/7 is best for their plants. This process enables them to absorb CO2 during the photosynthesis process continually.
Cons of autoflower cannabis
- Smaller yield: Most photoperiod plants produce an average of 600-700 grams per meter square whereas autoflowers generate about 450-550 grams per meter square. The yields increase if you grow them outdoors, regardless of whether they are photos or autos.
- Lower potency: For example, Royal Gorilla’s THC content is up to 27 percent, while the Auto version’s THC is 20 percent.
- Suboptimal cloning: Photoperiodic weed plants are far superior when it comes to cloning. The cutting of an autoflower will follow the same genetic timeline as the mother and will continue approaching the flowering stage, regardless of its size and development. This usually results in small and underdeveloped specimens with minimal yields to offer.
Do autoflowers need nutrients?
Like any other living plant, autoflowers do require nutrients, but administering them is a delicate balance. Going overboard on fertilizer can have adverse effects on cannabis seeds, just as feeding the wrong kind of nutrients can.
Be sure to choose a fertilizer specifically formulated for autoflowering strains and then micro-dose rather than pouring on liberally. Lightly fertilized soil is optimal for autoflowering seeds as long as you are nourishing the plants with supplements such as vitamin B, enzymes, and fungi.
Training your plant
It is best to complete the training process during the vegetative stage. It is essential to act fast because this stage is only a couple of weeks long for autos. Do not top, prune, or pinch your autoflowers like you might do when growing photoperiodic cannabis.
With autoflowers, the only training method you should use is low-stress training (LST), where you carefully bend and tie-down your plants so all bud sites are equally exposed to light. If you plan to do LST with your autoflowers, ensure that you start soon, but be gentle to avoid breaking your plants.
Where to find autoflowering seeds
It is relatively easy to buy autoflowering seeds online. There is an increasing number of reputable websites that sell them. Buying online makes it convenient to research and learn about the various strains you can grow. Online retailers often have a large selection to choose from.
At the same time, there are some potential drawbacks to buying seeds from an online store. For one, some weed-legal locations still outlaw buying and shipping seeds across state or national borders. There are also issues of reliability. If you want to buy from an online seed bank, take some time researching the company. Make sure they are reputable and in good standing with their customers.
Alternatively, you may be able to purchase autoflowering seeds from a local dispensary. In this case, you could ask a budtender about specifics relating to the seeds and which strains might suit your needs the best.
When choosing between different seeds, ask yourself the following questions:
- What level of THC and CBD are you looking for?
- Do you have a preferred taste and aroma?
- What kind of growing conditions will you plant the seeds in?
How to grow autoflower cannabis plants
Autoflowering strains require some preparation, as they will grow quickly and start to flower whether or not you are ready for them. However, follow these steps and you should find success in your autoflowering garden.
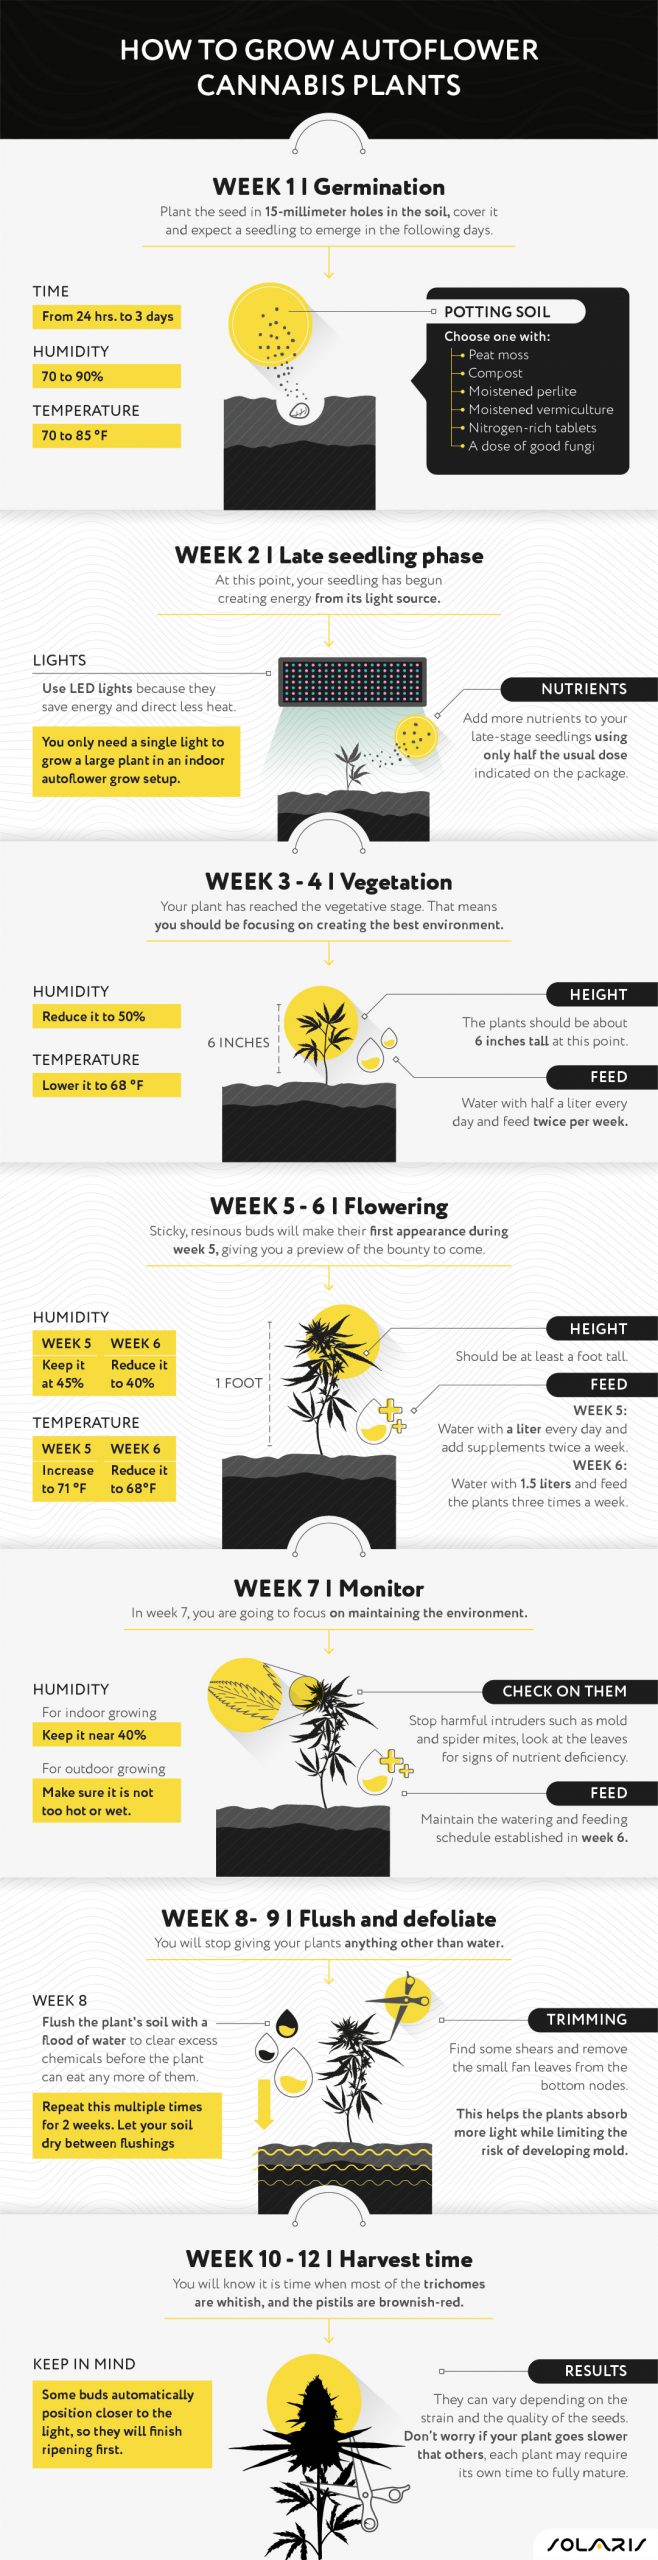
Week 1: Germination
This initial stage occurs within 3 days, sometimes as soon as 24 hours. Choose a potting soil mix or blend your own with peat moss, compost, moistened perlite, and moistened vermiculture, along with nitrogen-rich tablets containing other essential nutrients — plus a dose of good fungi.
The ideal planting environment for your cannabis seeds has 70 percent to 90 percent humidity and is 70 to 85 degrees Fahrenheit. Pour the soil into pots and poke 15-millimeter holes in the soil. Plant a seed in each hole, cover with soil and watch for a seedling to emerge in the next several days.
Week 2: Late seedling phase
At this point, your seedling has begun creating energy from its light source. If you are growing indoors, you will want to use LED lights because they save energy and direct less heat. You only need a single light to grow a large plant in an indoor autoflower grow setup.
Add more nutrients to your late-stage seedlings. Since you are growing autoflowers and not regular seeds, use only half the usual dose indicated on the package.
Week 3-4: Vegetation
Your plant has reached the vegetative stage. That means you should be focusing on creating the best environment. Change up the environmental conditions with low-stress training. Reduce the humidity to 50 percent, lower the temperature to 68 degrees, and feed twice per week.
The plants should be about 6 inches tall at this point. The fan leaves are sprouting, enhancing the photosynthesis process, and increasing your plant’s ability to create potent flowers. Water with half a liter every day and keep feeding it twice weekly.
Week 5-6: Flowering
Sticky, resinous buds will make their first appearance during week 5, giving you a preview of the bounty to come. Keep the humidity consistent at 45 percent but increase the temperature to about 71 degrees. Increase the water to a full liter each day and add supplements twice a week. Look for those containing phosphorus, calcium, magnesium, and potassium.
The plants should be at least a foot tall now. Do not be surprised to see a flower forming in every bud right around week 6. Drop the humidity to 40 percent and reduce the temperature back to 68 degrees. Water with 1.5 liters and feed the plants three times a week.
After week 6, you are in the home stretch of raising autoflowering plants to maturity.
Week 7: Monitor
In week 7, you are going to focus on maintaining the environment. If you have your plants outside, make sure it is not too hot or wet. If they are inside, check the humidity. You should be near 40 percent.
It is crucial to stop harmful intruders such as mold and spider mites, so check your cannabis plants daily. Look at the leaves for signs of nutrient deficiency. Maintain the watering and feeding schedule established in week 6.
Week 8-9: Flush and defoliate
Start the process of flushing on week 8. This means you stop giving your plants anything other than water. You do not want any of that stuff in your final harvest. Flush the plant’s soil with a flood of water so that any excess chemicals are cleared before the plant can eat any more of them.
This will prevent those chemicals from remaining in the plant when it is time to harvest. Repeat the flooding process multiple times for up to two weeks. Be sure to allow your soil to dry out between flushings.
Now, it is time to do a little trimming. Find some shears and remove the small fan leaves from the bottom nodes. Defoliation helps the plants absorb more light while limiting the risk of developing mold.
Week 10-12: Harvest time
Depending on your specific strain, you may be ready for harvest anywhere from 10-12 weeks. You will know it is time when most of the trichomes are whitish, and the pistils are brownish-red. If you flushed your plants, the fan leaves might look rust-colored or otherwise discolored, this is perfectly normal.
Keep in mind regardless of how much you trained your plant, some buds automatically position closer to the light, and as a result, will finish ripening first.
Especially when growing autoflowers indoors, your results can vary depending on the strain and the quality of the seeds. If your plant seems to progress slower or faster than others, do not worry. Each plant is unique and may require its own time to fully mature.
Curing and storing autoflower weed
Many of the same drying, curing, and storing rules apply with autoflowering cannabis plants. You can dry your buds by hanging them upside down for a few days. Store them in airtight containers but ensure there is a bit of space in each jar. Initially, open the jars once a day for a few minutes.
After a week, opening the jars once every 2-3 days will suffice. The key is to keep the humidity inside the jar to around 62 percent. Your bud will be done curing after a minimum of 2 weeks but could take up to 2 months, depending on how patient you are.