Growing cannabis indoors comes with a large set of advantages. You will have complete control over temperature, humidity, water, and lighting. Such command over your growing space will enable you to boost plant health, optimize yields, and keep pathogens and pests at bay.
However, growing indoors comes with a downside, too. Things can get very, very smelly. Nowadays, odor filters are one of the most important parts of growing cannabis indoors. Once the plants begin to flower, they begin stinking the place up.
If you do not have any way to mask the smell or filter it, you may end up having issues with your roommates, neighbors, and even the authorities.
What are carbon filters?
Carbon filters play an important role in any indoor cultivation environment. Aside from growing tents, these devices are also found in air conditioning and furnaces where they help to capture contaminants while allowing clean air to pass through.
When it comes to growing cannabis, the focus is aromatic terpenes. Although these pleasant molecules determine the taste and effects of cannabis, they also unleash a strong smell. Carbon filters work by trapping unwanted smells and dust particles to allow fresh, odor-free air to filter through the tube.
There is a variety of materials carbon filters use, but most use charcoal (activated carbon). It is a porous material and useful for many things from getting rid of certain gases in the air to being used as a lining for face masks.
Active carbon has a massive surface area with hundreds of pores. These pores can trap molecules from the air through a process known as adsorption (not to be confused with absorption). This process allows molecules like dust, dirt, and odor molecules to stick to the carbon, preventing them from traveling freely back into the air.
Of course, air does not just float into the carbon to be filtered. You force the odorous molecules from your grow room to stick to the active carbon within your carbon filter with an exhaust fan.
The fan pulls all the air in your grow room and pushes it through the filter, effectively keeping dust and odor molecules from escaping and spreading odors outside your grow room or grow tent system.
What to look for in a carbon filter
It is not easy to choose the right carbon filter considering the abundance of options on the market. However, when you put the following into consideration, your chances of choosing the right one is significantly better:
- Pre-filter: Many carbon filters now come packaged with pre-filters that you put outside of your carbon filter. Pre-filters help in reducing particles like dust from getting into the carbon filter. Not only will this improve the lifespan of the carbon filter itself, but also the inline fan or other equipment you use with your carbon filter.
- Carbon thickness: When the carbon is thicker, the absorption will be greater, which makes the carbon filter more effective in controlling odor. Because thicker carbon filters are more efficient, you should expect a higher price tag for them.
- Durability: While it might be tempting to go for inexpensive models, it is better to buy expensive, higher-quality carbon filters than for you to choose lower-quality ones that may not last long. Sturdy carbon filters have better performance and generally last longer, and their maintenance is lighter compared to their counterparts.
Find the right size filter
All carbon filters are not made equal. Depending on the size of your growing area and the cubic feet per minute (CFM) value of your exhaust fans, there are different-sized carbon air filters that will be right for you.
To determine the CFM value, you will need to follow these steps:
- Measure the height, width, and length of your grow room or grow tent.
- Multiply these numbers to calculate the cubic footage of the space you will be using.
- Multiply this number by the exchange rate (the number of times you want the air to be completely exchanged each hour). To have a constant flow of fresh air, you will want to multiply by 60, which is once per minute.
- Your CFM is this number divided by 60.
The best way to figure out which size carbon grow room filter you should use is to make sure that your filter’s CFM value is either equal to or lower than the CFM value of your grow room and your exhaust fan.
For example, say you have a 5ft x 5ft x 8ft grow tent:
- Multiply 5x5x8. You get 200, which is the cubic feet of your growing space.
- Multiply the cubic feet (200) by the number of exchanges per hour (60), which gives you 12,000.
- Divide that number (12,000) by the minutes of exchange in an hour (60) for a total of 200 CFM.
- Take the 200 CFM you have and look for a filter that meets or exceeds that CFM.
In general, it is always better to go over your CFM requirement than under. If you get a smaller filter than you need, you will use up the carbon quickly.
Set up your carbon filter
Once you know which size filter you need, you then need to make sure that you set it up properly. For you to make the most of your carbon air filter, you need to ensure that it is filtering all of the air that is in your grow room.
This means you need to connect it to a grow room fan and connect ducting to it, then seal it properly using duct clamps.
Place the fan and filter above or near your plants. Next, position the fan so it pulls air from your grow room and exhausts it into the filter. This setup will make sure that all of the molecules in the air will pass through your carbon filter before any air leaves your grow room.
Maintain your carbon filter
When all of the pores, or adsorption sites, in the carbon are full, your carbon filter will no longer be able to trap new molecules. You can maintain your carbon filter by making sure you clean it about once a month.
To clean your filter, you should take the filter out of your grow room, then shake out any trapped dust and debris.
Contrary to popular belief, using water and soap to clean charcoal in a filter can have an adverse effect. Remember that charcoal breaks down, and with the aid of water, you can speed up that erosion.
Depending on how much work it is forced to do, carbon air filters should be changed every 1-1.5 years. That said, if you start to notice a strong odor even after you clean the filter at home, chances are it is time for a new one.
How to build your own carbon filter
Hydroponic stores, hardware shops, and e-commerce websites all offer a wide range of effective carbon filters. However, if you are a do-it-yourself type of person then you should be able to make your very own carbon filter at home. Follow the tips below to secure the materials you will need, and learn how to put them together.
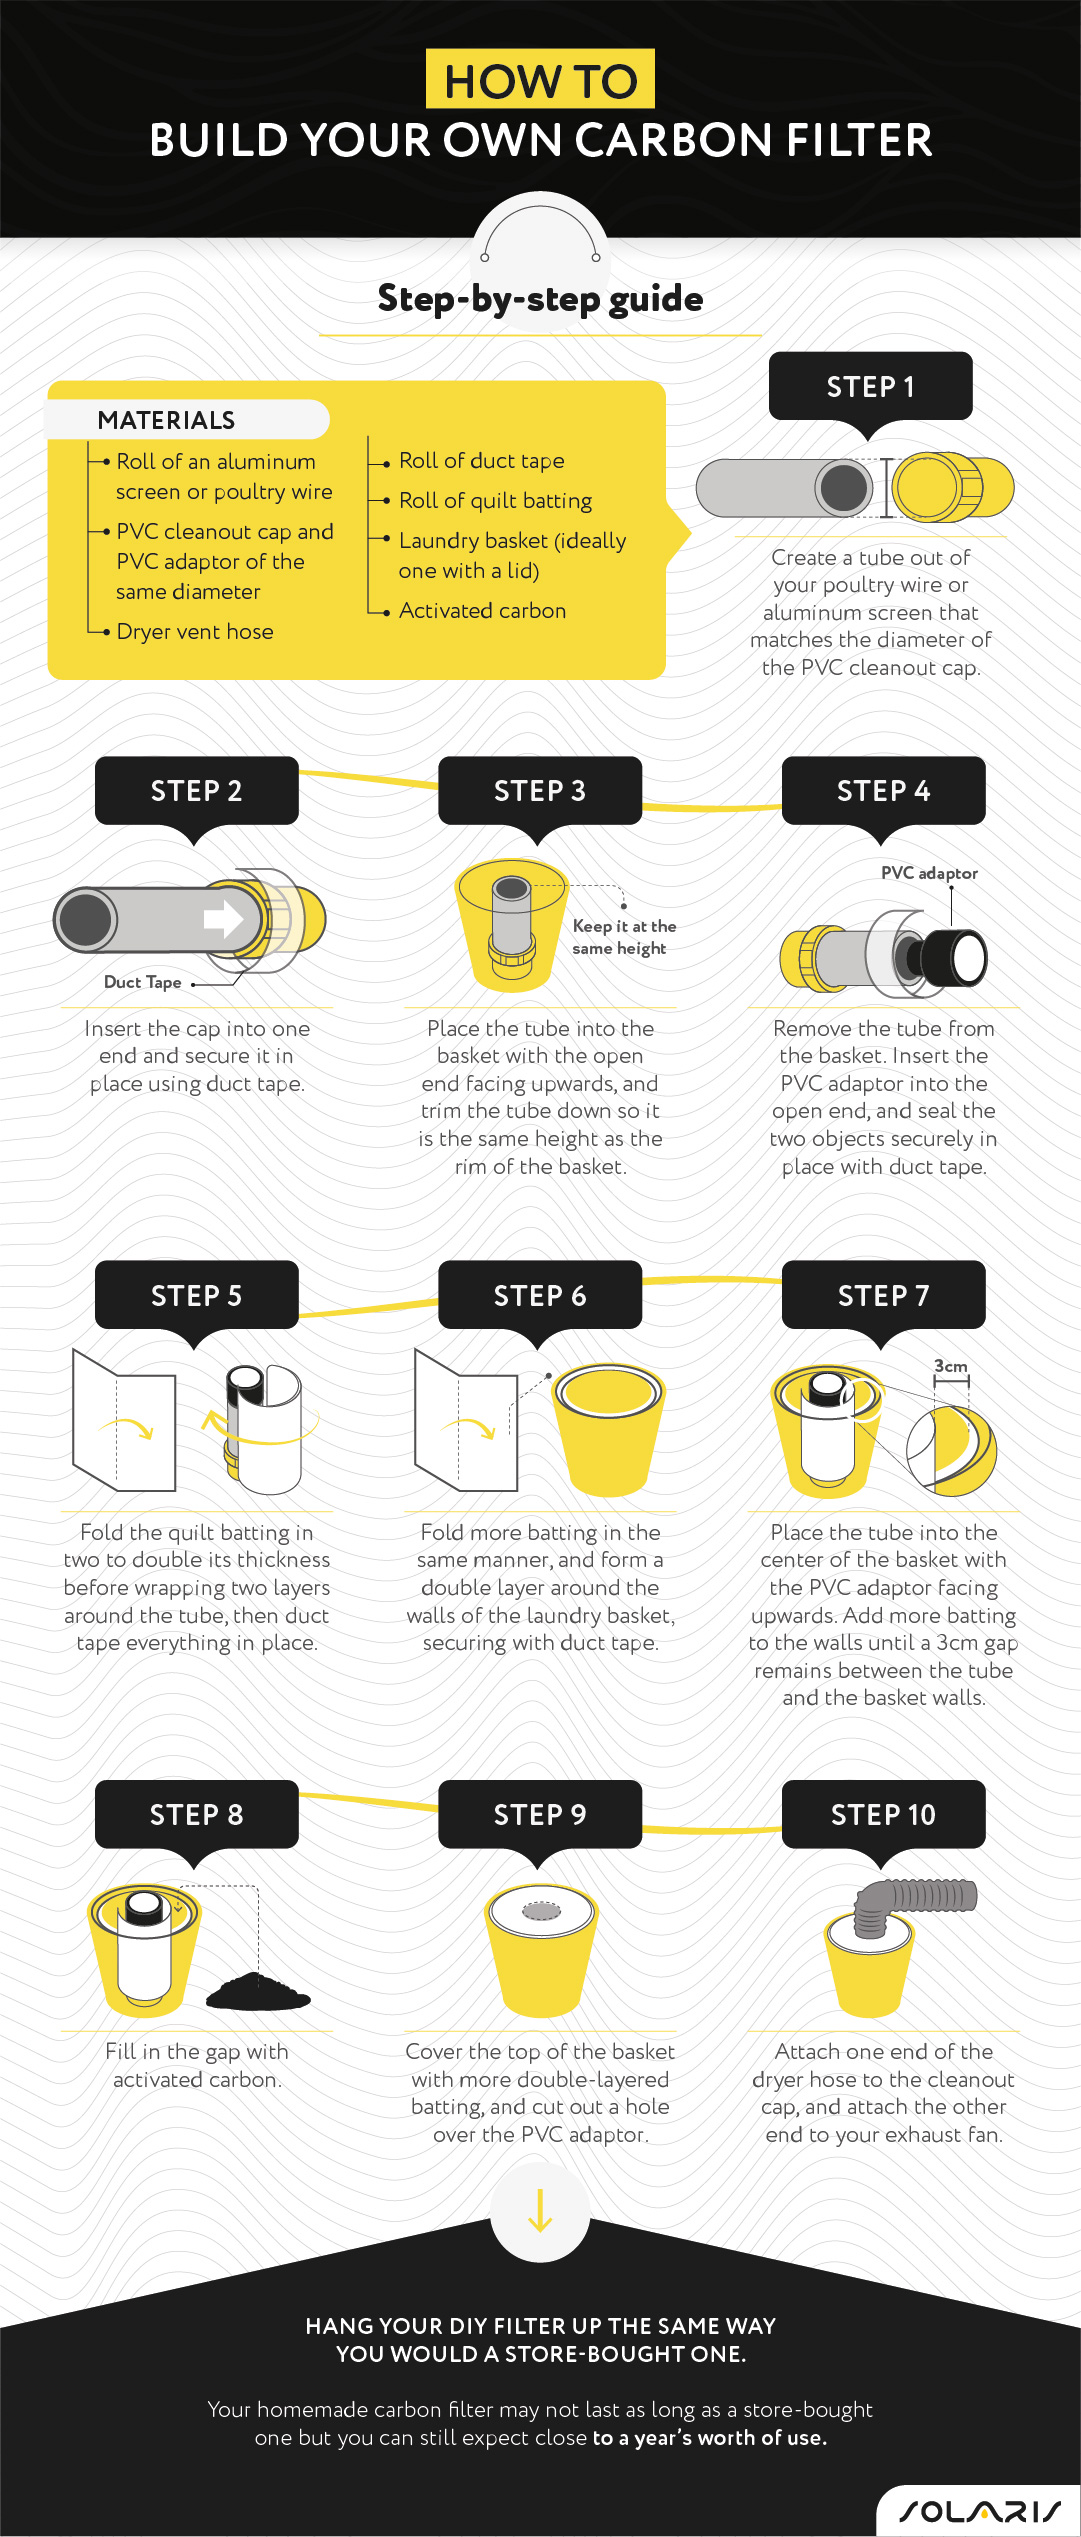
Materials
You should easily be able to obtain all the materials you need to build your own carbon filter after one trip to the hardware store and a brief look around your house. Look for the following items:
- Roll of an aluminum screen or poultry wire
- PVC cleanout cap and PVC adaptor of the same diameter
- Dryer vent hose
- Roll of duct tape
- Roll of quilt batting
- Laundry basket (ideally one with a lid)
- Activated carbon
Step-by-step guide
Now that you have all of your materials place them in a large clean work area to begin construction. Use the following steps to create your own working carbon filter.
-
- Create a tube out of your poultry wire or aluminum screen that matches the diameter of the PVC cleanout cap.
- Insert the cap into one end and secure it in place using duct tape.
- Place the tube into the basket with the open end facing upwards, and trim the tube down so it is the same height as the rim of the basket.
- Remove the tube from the basket. Insert the PVC adaptor into the open end, and seal the two objects securely in place with duct tape.
- Fold the quilt batting in two to double its thickness before wrapping two layers around the tube, then duct tape everything in place.
- Fold more batting in the same manner, and form a double layer around the walls of the laundry basket, securing with duct tape.
- Place the tube into the center of the basket with the PVC adaptor facing upwards. Add more batting to the walls until a 3cm gap remains between the tube and the basket walls.
- Fill in the gap with activated carbon.
- Cover the top of the basket with more double-layered batting, and cut out a hole over the PVC adaptor.
Attach one end of the dryer hose to the cleanout cap, and attach the other end to your exhaust fan.
Hang your DIY filter up the same way you would a store-bought one and begin filtering the aromas of your plants. Your homemade carbon filter may not last as long as a store-bought one but you can still expect close to a year’s worth of use.
A sudden increase in aromatic terpenes outside of your grow tent will indicate the expiration date has come. When that happens, simply remove the lid and exchange the spent carbon with a fresh load.