The legalization of medical and recreational marijuana across several states has enabled many consumers to become accustomed to purchasing cannabis from a dispensary. Even more intriguing though is the opportunity that legalization has created for adults and medical patients to cultivate cannabis on their own private property.
While the laws, limitations, and regulations are different for each state, almost every state with some form of legalized cannabis does allow home cultivation to some extent. Even though it is completely legal, some people do not take advantage of their right to grow cannabis due to the perception that it is too difficult, expensive, or time-consuming.
The cost of setting up and running a grow room, plus feeding and caring for your plants, can easily seem out of reach for the hobby grower. However, growing weed is very possible for anyone who is willing to dedicate some time and care for a beloved plant.
Starting with seeds
You may have found a seed or two in your weed stash and have been tempted to plant it. However, this is not the best way to go. Investing in quality cannabis seeds from the start can potentially save you money and stress in the long-run.
When you buy seeds from a respected seed bank, you are paying for guaranteed quality. Established seed banks have teams of dedicated breeders and growers constantly working to improve their genetics. That means, after germinating your seeds, you can rest assured that your plants will grow strong and healthy and should reward you with good yields of top-shelf bud.
Autoflowering cannabis plants start flowering on their own within 2-4 weeks of germination, regardless of whether there was a change in the ratio of light to dark hours.
Classic plant varieties, both indica and sativa dominant, are photoperiodic. Most growers trigger the flowering process in photoperiod marijuana plants by shortening their light cycles to an even 12 hours of light and 12 hours of dark each day.
This can be difficult for outdoor grows, depending on the time of year it is or the location of your plants. This is an advantage to using autoflowering seeds especially for growing outdoors.
Skipping steps with clones
There are all sorts of ways to grow your own cannabis plants. Some people prefer seeds for natural growth reasons, others prefer growing clones, which are a quicker, more effective way of growing genetically identical buds that were first produced from a mother plant.
Many dispensaries have caught on to this new way of growing. It is a great way to start your own harvest from a mother plant you really enjoy.
If you are looking to recreate an existing strain, clones are definitely the way to go. Clones are rooted cuttings that are specifically identical to the plant they were taken from. Cloning your own cannabis plants can be extremely cost-efficient and may give you a harvest that is completely sustainable.
Indoor vs. Outdoor grows
You can grow cannabis indoors or outdoors. An indoor setup provides total control over the growing process, such as how much light the plants receive. However, indoor growers carry a lot of responsibility since the cannabis plants entirely depend on the grower for their survival.
Alternatively, you could grow your weed plants outdoors. This option is less expensive because nature does a significant portion of the work. However, outdoor grow sites are not as private as many people would prefer, and growers often have to contend with the risk of their plants being stolen or even trampled by animals.
Outdoor growing
Growing marijuana outdoors is great because you will not need to spend a ton of money on it and you can rely on the power of the sun. If you have access to a sunny spot in a private yard or even a balcony, terrace, or rooftop, you can grow weed outside. You will be tied to the sun and the seasons and local weather, but you will not have to spend a bunch of money on equipment and utilities like indoor growers.
The sky is the limit with outdoor plants. You can let them get as big and tall as you want, as long as they are manageable. One plant can potentially yield between a half-pound and full-pound of dried and cured flower. With an indoor grow, your space is a lot more restricted.
It is crucial to have a good understanding of the climate in the area you are going to grow. Cannabis is highly adaptable to various conditions, but it is susceptible to extreme weather.
Sustained temperatures above 85°F will cause your plants to stop growing, while continued temperatures below 55°F can cause damage and stunting to plants, even death.
Heavy rains and high winds can cause physical damage to plants and reduce yields, and excessive moisture can lead to mold and powdery mildew, especially during the flowering stage.
The main concern with growing outdoors is you need the right space. Not only do you need physical room for them, but they need to be in a place that will get full, direct sun for at least 6 hours a day. You may have a backyard, but it might not be great to grow there if it does not get full sun every day.
Your cannabis plants should receive as much direct sunlight as possible, ideally during midday, when the quality of light is best. As the season changes and fall approaches, your plants will get less and less sunlight throughout the day, which will trigger the flowering stage.
Having a constant breeze is good for your plants, and especially in hot climates. But if you live in an area with a lot of high winds, consider planting near a windbreak of some sort, like a wall, fence, or large shrubbery.
You also want to consider privacy and security. A lot of people want to conceal their weed gardens from judgmental neighbors and potential thieves. Tall fences and large shrubs or trees are your best bet unless you live in a secluded area. Also, most state laws require that you keep cannabis plants concealed from the public.
Indoor growing
Perhaps the best part about indoor growing, is that you are not tied to the sun and the seasons. You can let your plants get as big as you want, flip them into flower, harvest, and then start another batch right away. You can grow whenever you want, even straight through winter.
Keeping your plants indoors will also keep them locked away and hidden from the public, which should abide by any state law.
Growing cannabis indoors presents a unique set of challenges for a new grower. There are many more considerations involved and a lot more expenses. The rest of this article is going to focus on how to grow weed specifically indoors.
If you plan on having an outdoor grow, you can skip down to the end to learn how to harvest your crop.
Deciding on your grow medium
A growing medium is where your cannabis plants develop their root system. Many growers keep it simple with pots of soil, but you can also use coco coir, perlite, rockwool, or go for a fully-fledged hydroponic setup.
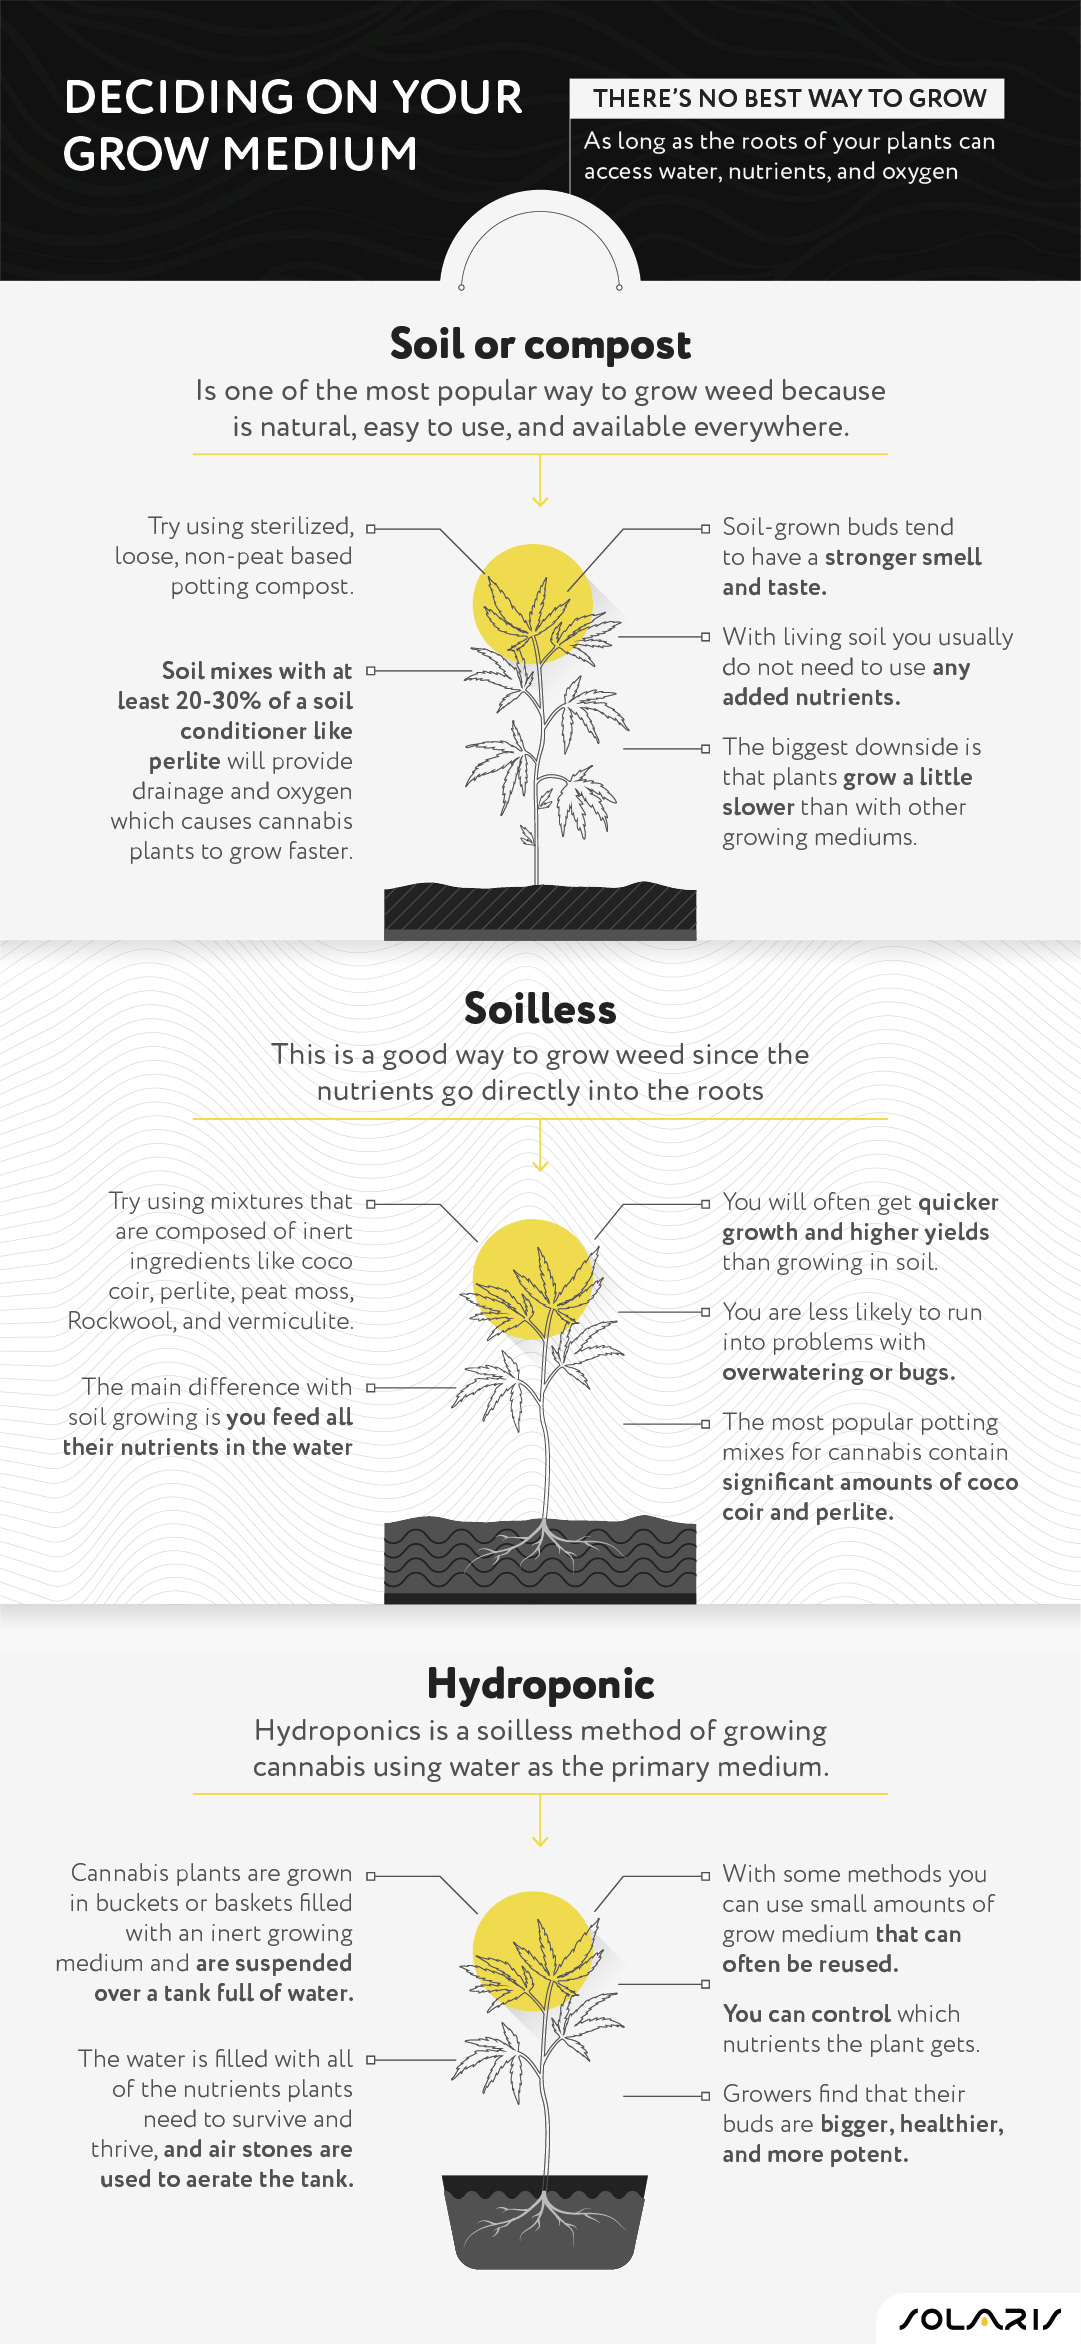
What is important to know is that there really is no “best” way to grow. Each medium has its pros and cons, though you may prefer one over the other based on your preferences and resources. As long as the roots of your plants can access water, nutrients, and oxygen, they will grow.
Soil or compost
Soil or compost is one of the most popular growing mediums for cannabis plants because it is natural, easy to use, and available everywhere.
Good cannabis soil naturally contains at least some amount of nutrients, which means it will provide the nutrients your plants need for at least the first few weeks of life. If you decide to grow cannabis with soil, try using sterilized, loose, non-peat based potting compost. Often these are listed as an “organic potting mix.”
Soil mixes with at least 20-30 percent of a soil conditioner like perlite (little white rocks in the soil) will provide drainage and keep higher amounts of air/oxygen in the soil, which causes cannabis plants to grow faster.
Plants in soil grow a little slower than in coco or hydro, but soil-grown buds tend to have a stronger smell and taste. Although using a standard soil potting mix and giving nutrients in the water gets results similar to coco, using amended and composted living soil tends to produce buds with a powerful and complex scent and taste profile.
With living soil, a colony of microorganisms in the soil creates an ecosystem that mimics the best-of-the-best soil in nature. The nutrients are slowly broken down from organic sources and delivered directly to your plant roots. One thing that is really great about living soil is you usually do not need to use any added nutrients.
The result is buds grown only with natural processes and all you have to do is just add water and let the soil do all the work.
The biggest downside to living soil is that plants tend to grow a little slower than with other grow mediums, and some people do not like the smell of the composted soil, especially in the house.
Soilless
Soilless potting mixtures that are composed of inert (non-soil) ingredients like coco coir, perlite, peat moss, Rockwool, and vermiculite can be a great choice for growing cannabis.
When growing in a soilless medium, you can treat your plants nearly the same as if growing in soil. The main difference is you feed all their nutrients in the water. As a result of your plants getting nutrients delivered directly to their roots, you will often get quicker growth and higher yields than growing in soil (where the roots have to seek out nutrition).
Another advantage of growing in a soilless mix over soil is that you are less likely to run into problems with overwatering or bugs.
Although there are many different possible soilless ingredients, the most popular potting mixes for cannabis contain significant amounts of coco coir and perlite.
This combination seems to work especially well for growing cannabis. As a result of coco’s growing popularity, other types of soilless mixes (especially the peat-based ones) have become far less common in cannabis grow rooms over the years.
Even when it comes to soil mixes, you still often see both coco and perlite in the ingredient list, because they help improve the overall properties of the soil.
Hydroponic
Hydroponics is a soilless method of growing cannabis using water as the primary medium. Within a hydroponic setup, cannabis plants are grown in buckets or baskets filled with an inert growing medium and are suspended over a tank full of water. The water is filled with all of the nutrients plants need to survive and thrive, and air stones are used to aerate the tank.
This basic model manifests in many different forms and systems, with different growers preferring different setups.
Cannabis growers have been using different hydroponic methods for many years as a way to maximize yields and speed up growth, the two main advantages of soilless growing. With some hydroponic methods, you get to use small amounts of grow medium that can often be reused while also precisely controlling what nutrients the plants are receiving and pH levels.
With such levels of control, growers find that their buds are bigger, healthier, and more potent.
Whether you have grown cannabis before or have no experience growing whatsoever, hydroponics can be a great way to produce cannabis in any size space.
Finding the proper grow light
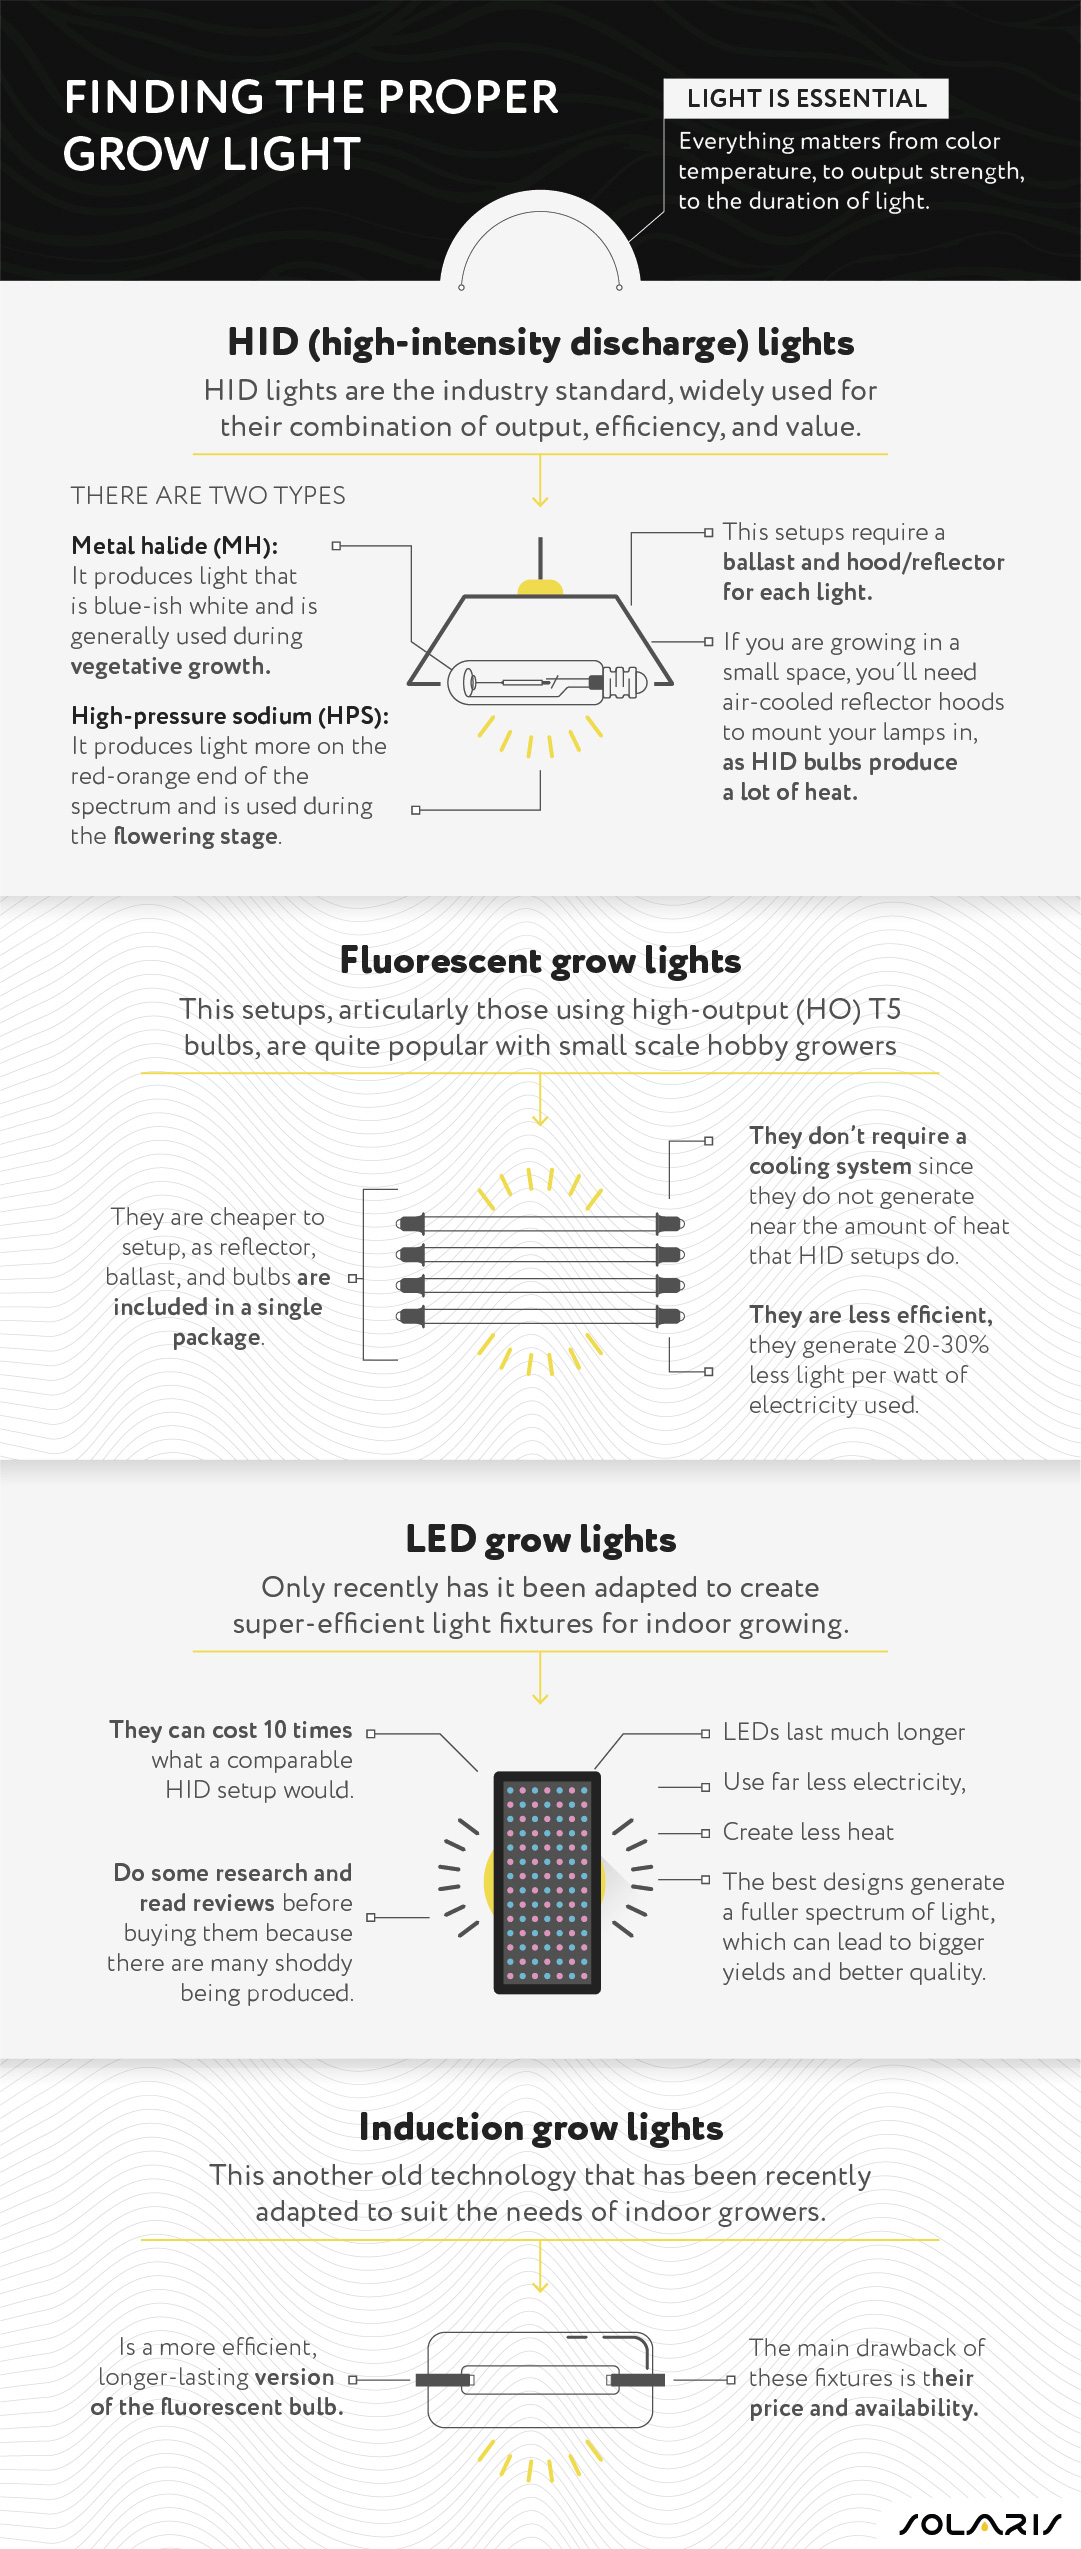
The sun is crucially important for plants. When growing indoors, it is essential to try and imitate the sun the best you can. Everything matters from color temperature, to output strength, to the duration of light.
Lighting is not something to be taken for granted or to cheap out on. The following are different lights that can be used for your indoor grow setup.
HID (high-intensity discharge) lights
HID lights are the industry standard, widely used for their combination of output, efficiency, and value. They cost a bit more than incandescent or fluorescent fixtures but produce far more light per unit of electricity used. Conversely, they are not as efficient as LED lighting, but they cost as little as one-tenth as much for comparable units.
The two main types of HID lamp used for growing are:
- Metal halide (MH): which produces light that is blue-ish white and is generally used during vegetative growth.
- High-pressure sodium (HPS): which produces light that is more on the red-orange end of the spectrum and is used during the flowering stage.
In addition to bulbs, HID lighting setups require a ballast and hood/reflector for each light. Some ballasts are designed for use with either MH or HPS lamps, while many newer designs will run both.
If you cannot afford both MH and HPS bulbs, start with HPS as they deliver more light per watt. Magnetic ballasts are cheaper than digital ballasts, but run hotter, are less efficient, and harder on your bulbs. Digital ballasts are generally a better option but are more expensive.
Beware of cheap digital ballasts, as they are often not well shielded and can create electromagnetic interference that will affect radio and WiFi signals.
Unless you are growing in a large, open space with a lot of ventilation, you will need air-cooled reflector hoods to mount your lamps in, as HID bulbs produce a lot of heat. This requires ducting and exhaust fans, which will increase your initial cost but make controlling the temperature in your grow room much easier.
Fluorescent grow lights
Fluorescent light fixtures, particularly those using high-output (HO) T5 bulbs, are quite popular with small scale hobby growers.
This is because they tend to be cheaper to set up, as reflector, ballast, and bulbs are included in a single package. They also do not require a cooling system since they do not generate near the amount of heat that HID setups do
The main drawback is that fluorescent lights are less efficient, generating about 20-30 percent less light per watt of electricity used. Space is another concern, as it would require approximately 19 four-foot-long T5 HO bulbs to equal the output of a single 600-watt HPS bulb.
LED grow lights
Light-emitting diode (LED) technology has been around for a while, but only recently has it been adapted to create super-efficient light fixtures for indoor growing. The main drawback to LED grow lights is their cost; well-designed fixtures can cost 10 times what a comparable HID setup would.
The benefits are that LEDs last much longer, use far less electricity, create less heat, and the best designs generate a fuller spectrum of light, which can lead to bigger yields and better quality.
Unfortunately, there are many shoddy LED lights being produced and marketed towards growers, so do some research and read product reviews before laying down your hard-earned cash.
Induction grow lights
Induction lamps, otherwise known as electrodeless fluorescent lamps, are another old technology that has been recently adapted to suit the needs of indoor growers. The induction lamp is essentially a more efficient, longer-lasting version of the fluorescent bulb. The main drawback of these fixtures is their price and availability.
Select your nutrients
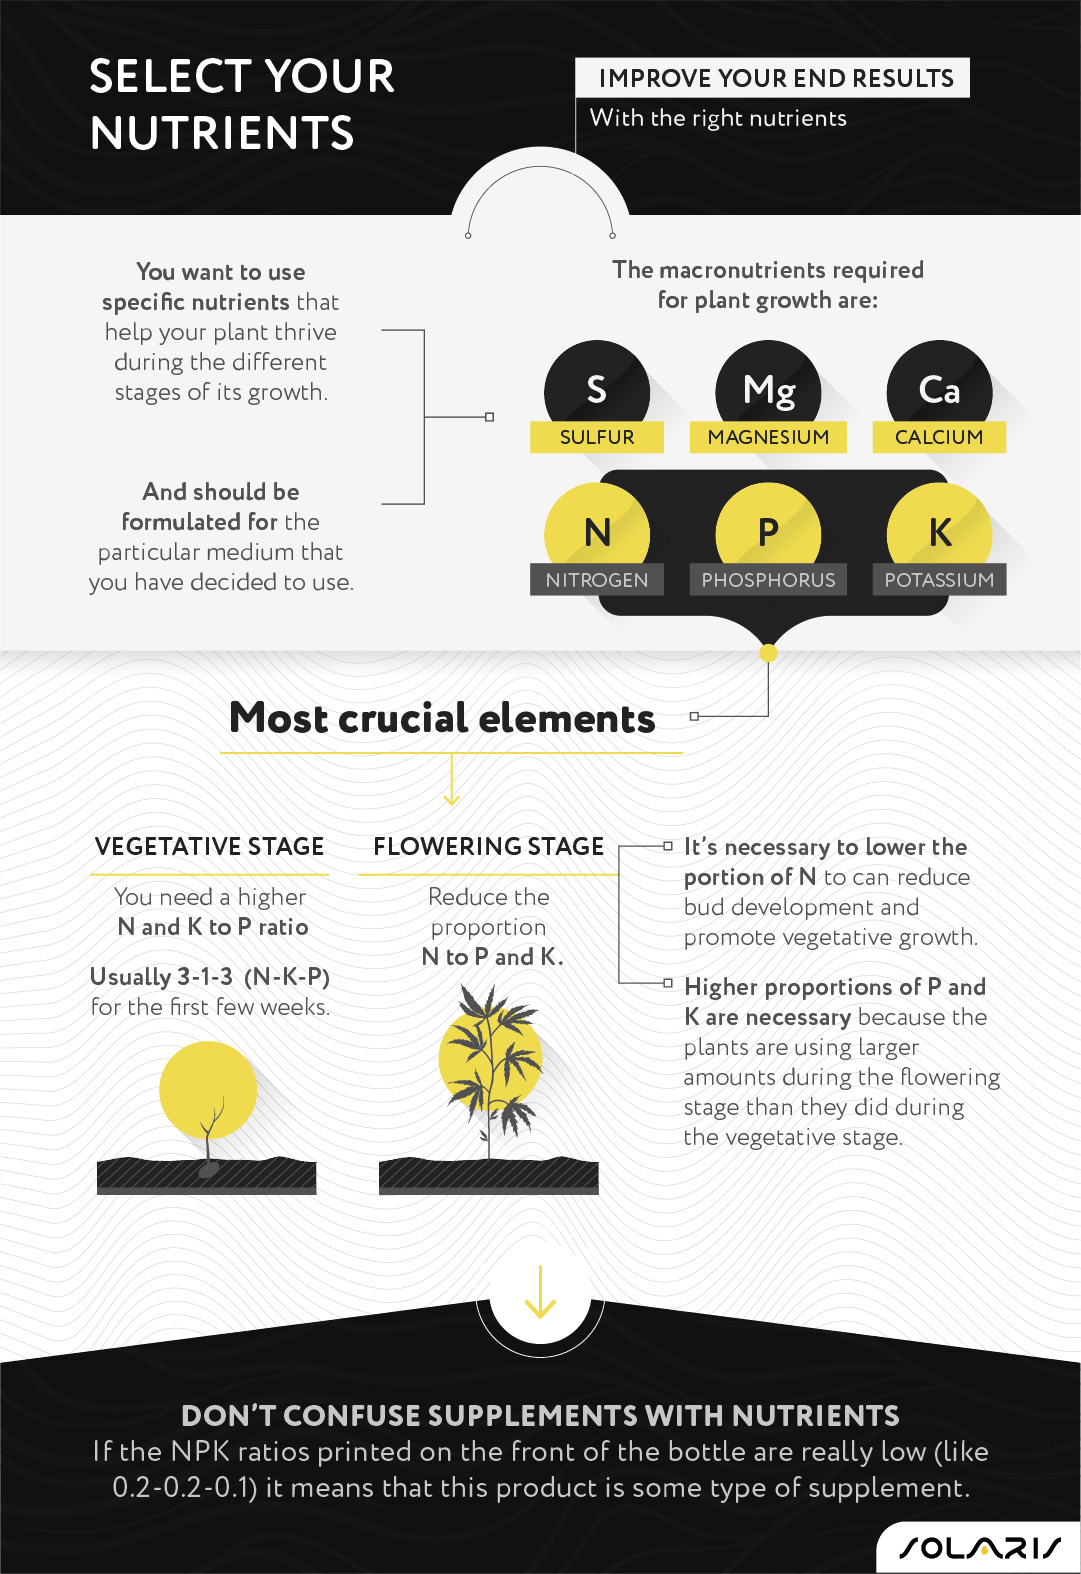
It can be easy to grow a cannabis plant, but nutrients can improve the end results. With cannabis, you want to use specific nutrients that help your plant thrive during the different stages of its growth. Those nutrients should be formulated for the particular medium that you have decided to use. Certain nutrients will only work in hydroponic systems, while others are designed for soil.
Hydrogen, oxygen, and carbon are considered non-mineral essential plant elements. They are taken up by the plants in either gas or vapor form. In ideal growing conditions, fresh air and water will provide ample hydrogen, oxygen, and carbon. These are, of course, the basic building blocks of life.
The macronutrients required for plant growth are:
- Nitrogen
- Phosphorus
- Potassium
- Sulfur
- Magnesium
- Calcium
Nitrogen (N), Phosphorus (P), and Potassium (K) are the most crucial elements. If you purchase a bag of nutrients from a store, you should notice an N-P-K ratio listed on it.
The ideal ratio changes throughout the growth cycle of your marijuana plants. For instance, you need a higher proportion of N and K to P during the vegetative stage. A general rule of thumb is to remain close to a 3-1-3 (N-P-K) ratio for the first few weeks.
During flowering, it is best to reduce the proportion of N to P and K compared to the ratio used during the vegetative stage. It is essential to lower the portion of N at this point. It can reduce bud development and promote vegetative growth instead of generative (also known as flowering) growth.
Maintaining higher proportions of P and K is critical when flowering. This is because the plants are using larger amounts during the flowering stage than they did during the vegetative stage.
Do not confuse supplements for nutrients. If the NPK ratios printed on the front of the bottle are really low (like 0.2-0.2-0.1) it means that this product is some type of supplement. Base nutrients provide all the necessary NPK and micronutrients for healthy growth, so supplements are not necessary for plants to thrive.
Some supplements are helpful, but going overboard may cause unwanted reactions to your plant.
Harvesting your plants
Whether you grew your plant indoors or outdoors, harvest time is both exciting and rewarding. Finally, all of your hard work and patience is about to pay off.
First, you need to check the plant’s buds to see if they are ready to harvest. To do this, you will have to check the color of the pistils on the flower. The pistils are wispy white hairs growing out of the buds. These wisps will change color gradually until they become amber at the peak of maturity.
Harvest the buds once approximately 40 percent of the pistils become darker in color. Wait until 50-70 percent of those hairs have darkened if you want buds with a high THC content. If you want buds that will make you relax, wait until more than 80 percent of the hairs are dark before you harvest. At this time, a significant portion of the THC in the buds will have converted to CBN (a cannabinoid that has a relaxing and calming effect).
“How do you harvest the buds?”
Simply just take some scissors and clip the buds off the branches on which they are attached. Next, you will need to hang them to dry out for 4-5 days, after which you should perform a final close trimming of small leaves and stems.
Then put your harvested buds into a jar or other sealed container and keep in a dark place. Briefly open the lid to allow in some air and then re-seal it. Perform this step once a day, every few days for about 2 weeks minimum.
This process is called curing and it allows for your buds to gradually lose some of their moisture content but without becoming too dry. Curing your weed also allows for most of the terpenes to stay intact which is what gives cannabis its fabulous aroma.