When you are growing cannabis, you want to keep your plants strong and healthy through every stage of the growing process and that includes the seedling stage.
The seedling stage can be an especially vulnerable time in the growing process. Cannabis seedling requires a lot of love and care to grow into a healthy cannabis plant.
What are seedlings?
The key thing to do during the seedling stage is simply to pay attention and keep tabs on every development or change that occurs in your cannabis seeds. When they sprout, the seams of the seed will split and allow a white tendril to poke through within several hours of this split. This tendril will grow very quickly, moving downward until it is deep enough for it to hold up the rest of the plant (namely the stalk and the seed husk).
The husk, now split into two, emerges from the ground and functions as a sort of makeshift leaf. In other words, it absorbs energy that can be used to produce chlorophyll within the plant. While you see the stalk growing upwards, you can also be sure that more roots are sprouting and growing downwards at the same time.
The first two leaves, unique from any future leaves that will grow, pop out of the split in the seed. These leaves are called sucker leaves and mark the beginning of more leaf growth.
Two-lobed leaves will then grow from the middle of the sucker leaves. These two-lobed leaves usually resemble chicken feet, since they have three lobes. After the three-lobed leaves come two leaves with five lobes, and then two more with seven. Seven-lobed leaves are the ones everyone recognizes as the iconic weed leaf.
If you were able to keep your weed plants healthy throughout their entire sprouting stage, they would most likely go through a very productive vegetative stage. Protecting your young plants is about more than just survival; it is about investment in your future harvest.
Choosing the right container
Your cannabis seedling needs space to grow. But too much space and too little space can both create problems for your plant.
If you try to grow your seedling in a container that is too large, the root system will not be able to absorb all the water in the soil. If you start growing your seedling in a container that is too small, the roots will not have space to extend and will start to wrap around themselves, which will also impact their ability to absorb water.
Choosing the right pot is an essential part of caring for your growing plant. You should also make sure the pot has drainage holes to get rid of any excess water that could overwhelm the plant.
How much water do seedlings need?
One common problem that occurs when trying to care for a seedling is giving them too much water. It is less of an issue having to do with too much water but has more to do with too little oxygen reaching your plant’s roots.
This happens most commonly with seedlings being grown in containers since water can only go so far as the walls of the container. If your plants are being overwatered, you will most likely see symptoms such as drooping leaves.
In soil, a good technique to gauge when water is needed is to stick your finger in the soil. Water plants when the soil feels dry up to your first knuckle (or if the pot feels light).
In coco coir, aim to water plants every 1-2 days. If the coco is staying wet for more than 3 days, try giving less water each time until plants get bigger and start drinking more. Do not wait for your coco coir to dry out, but do not water if the top inch feels wet. If the container feels light, it is time to water.
Signs of nutrient deficiencies
A nutrient deficiency can cause serious issues for your growing plant, so part of proper care is knowing how to spot the warning signs.
Nutrient deficiencies can come from a variety of places. “Hot” potting mixes that contain too many nutrients could cause nutrient toxicity. On the other end of the spectrum, under-watering can cause a deficiency in the key nutrients your plant needs to grow.
Some red flags that signal your seedling may have a deficiency in nutrients (or nutrient toxicity) include:
- Dark coloring (cannabis seedlings should be a vibrant shade of green)
- A burned appearance on the tip of the leaves
- Curling on the tip of the leaves
- Yellowing leaves
If you notice any of these issues with your plant, it could be the result of too many or too few nutrients. You will need to adjust your growing strategy to support your plant’s health.
Choosing the right lighting
Like any plant, seedlings need light to grow and thrive. But not all light is created equal. If you want your seedling to grow into a healthy cannabis plant, you need to expose it to the right type of light.
If you are growing your seedlings outdoors, they will need to be exposed to as much sunlight as possible. Keep them in the sun from sunrise to sunset; the more sunlight exposure they get, the better.
But growing your seedlings outdoors can be tricky. Because you cannot control sunlight, there is no way to ensure your cannabis seedlings are getting the light they need to grow properly. A cloudy day can prevent your seedlings from getting enough light and throw off your entire growth process.
Growing your seedlings indoors with artificial light gives you more control over the process, making it easier to ensure your plants are getting enough light each day. If you are growing with artificial lights (compact fluorescent lights that emit cooler, blue spectrum light are especially effective), aim to give your plants 18 hours on and 6 hours off each day.
Control the environment
Environmental conditions are essential to growing healthy cannabis seedlings, and some of the most important conditions to control are temperature and humidity.
The temperature in your grow environment should not exceed 80 degrees Fahrenheit, otherwise, the seedlings may grow too tall. You should also plan on lowering the temperature at night to about 70 degrees Fahrenheit.
You should also aim to keep humidity in the grow environment at a higher level, typically around 70 percent. That way, the plants can absorb moisture from the environment to develop stronger roots without getting weighed down by over-watering.
When to transplant seedlings
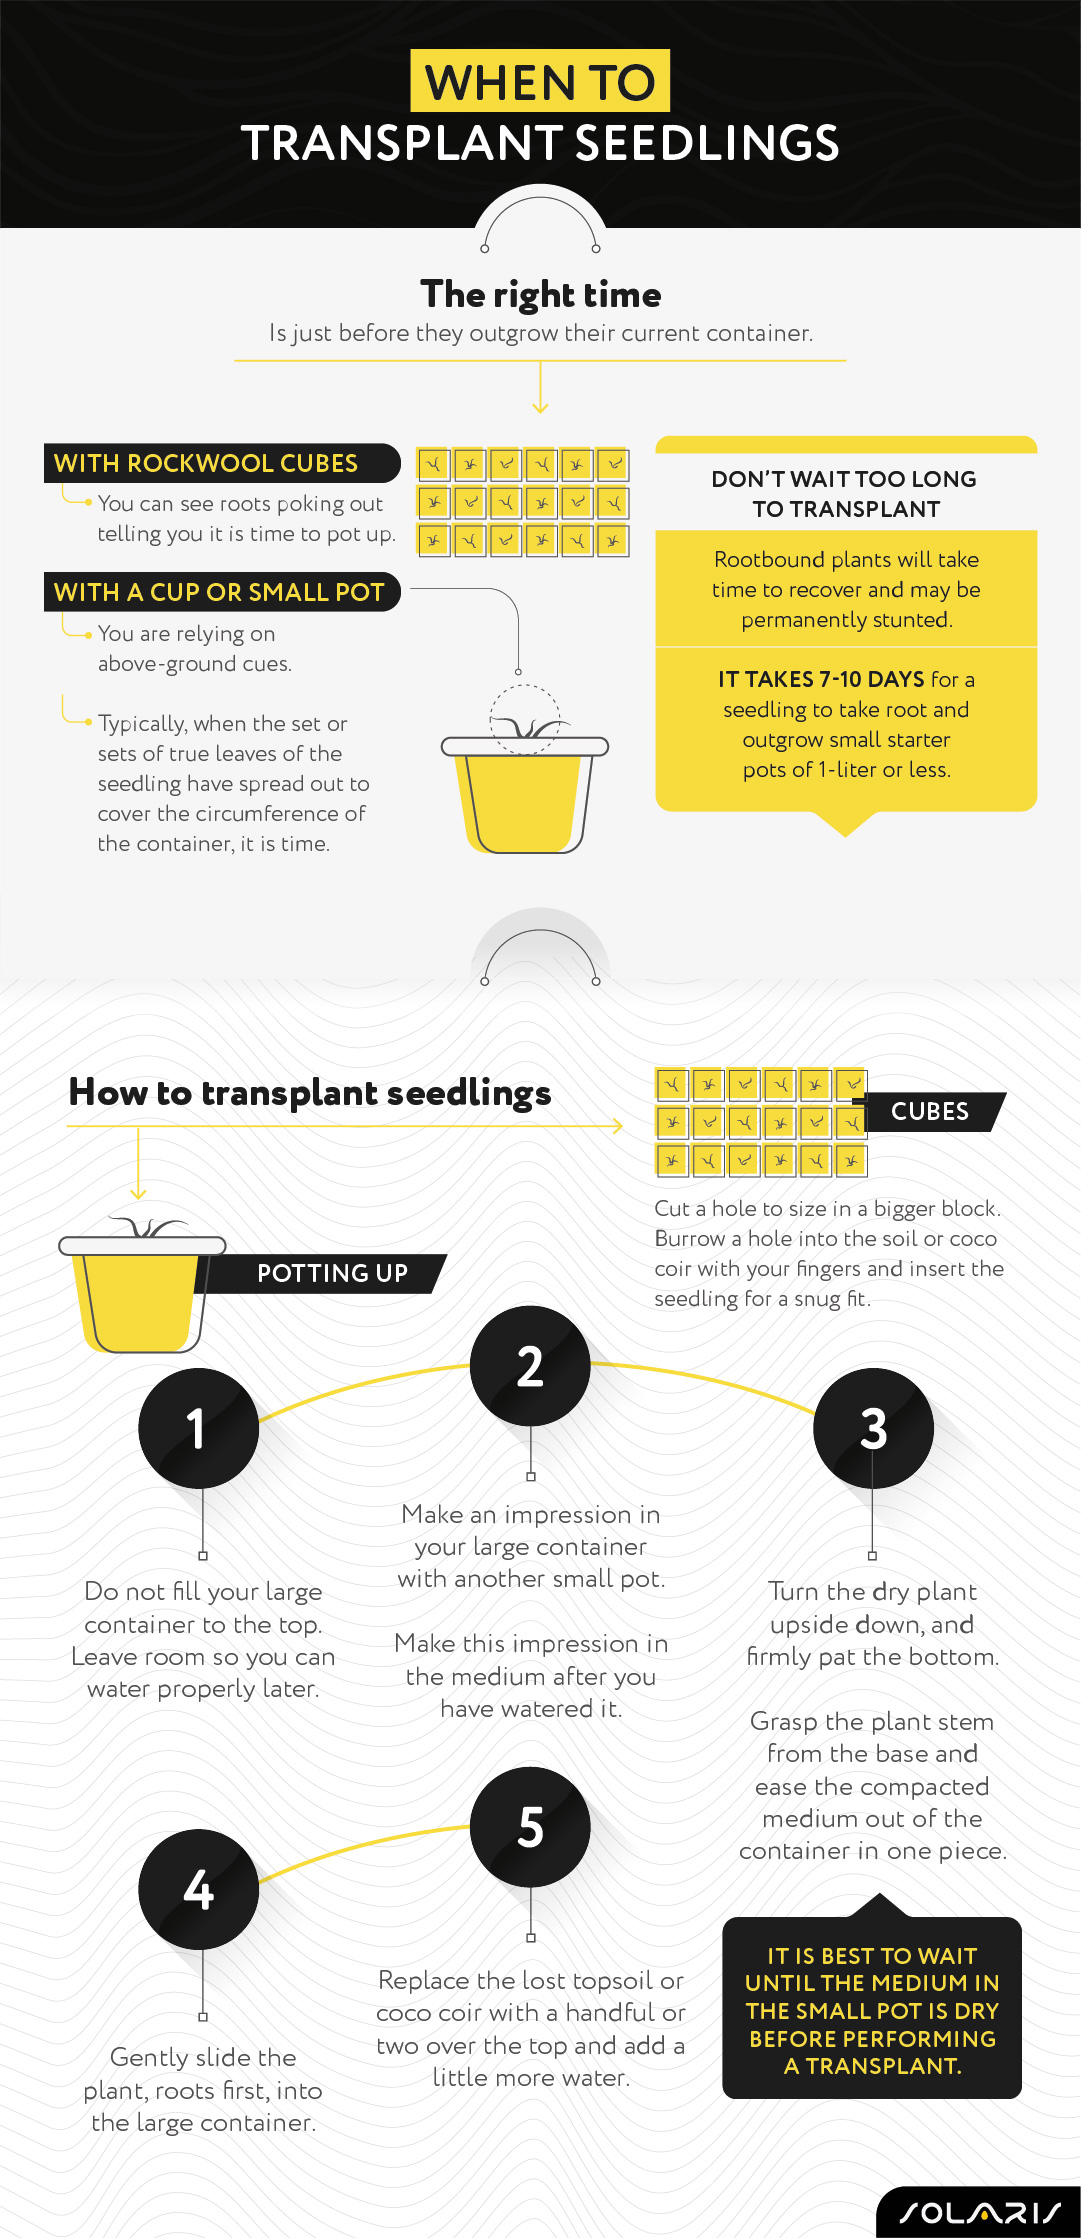
The right time to transplant your seedlings is just before they outgrow their current container. With Rockwool cubes, you can see roots poking out telling you it is time to pot up. When you start with a cup or small pot, you are relying on above-ground cues.
Typically, when the set or sets of true leaves of the seedling have spread out to cover the circumference of the container, it is time. Also, vertical growth will be an obvious indicator.
Do not wait too long to transplant. Rootbound plants will take time to recover and may be permanently stunted. In general, it takes 7-10 days for a seedling to take root and outgrow small starter pots of 1-liter or less.
How to transplant seedlings
Cubes are the easiest to work with. Either cut a hole to size in a bigger block or burrow a hole into the soil or coco coir with your fingers and insert the seedling for a snug fit. Potting up takes a little more finesse. First, do not fill your large container to the top. Leave room so you can water properly later. If you pack the pot to the top, water will mostly run off and not reach the roots.
Next, make an impression in your large container with another small pot, or the one with the plant in it if you do not have any others. Make this impression in the medium after you have watered it. This creates a perfect imprint for the transplant.
It is best to wait until the medium in the small pot is dry before performing a transplant. Wet soil can fall apart in chunks as you fumble with the sopping mud. Now, turn the dry plant upside down, and firmly pat the bottom. Grasp the plant stem from the base and ease the compacted medium out of the container in one piece. Some topsoil will spill, but this is completely fine.
Lastly, gently slide the plant, roots first, into the large container. Replace the lost topsoil or coco coir with a handful or two over the top and add a little more water.